
Our original set-up, as described in A Very Basic Guide to Soundmixing Using Voicemeeter worked very well for us back in a time when we could use Hangouts on Air to do our Game Nights on, although it had its own limitations (namely: five frames per second). In 2019 Google has decided to end Hangouts on Air so it’s time we updated our methods as well. In our examples here we’re using Discord (although will still work on Non-Hangouts-on-Air Google Hangouts as long as it lasts), and either XSplit (which I prefer) or OBS (which is free and popular). It should not be difficult to transpose settings to other programs (Skype etc). I’d like to thank Scott Rux for tech support, do follow him on Twitter (@sensei256).
What we’re trying to acheive here is:
- Party Chat
- Game audio in the party chat (who should be playing along on some kind of screenshare/direct feed).
- All of this seemlessly outputting to your broadcast software of choice.
Let’s go!
Pictures may be shrunk to fit the page, clicking on them should make them bigger.
Sound mixer and settings
We’ve moved up to Voicemeeter Banana, slightly more professional, greater use of sliders. The illustrations presume you have that downloaded (it’s donationware, so free with a suggested contribution as and when). You also need a Virtual Audio Cable. Unpack and install both of those as Administrator (left click, “Run as Administrator”).
First of all, settings.
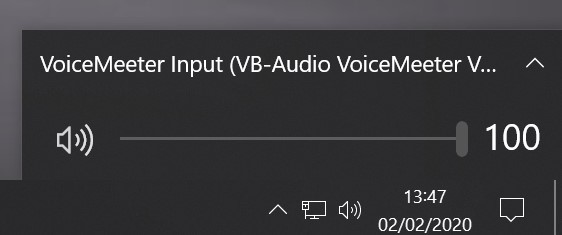
You need to make Voicemeeter Input your default sound setting. The quickest way to do this is to click on the speaker icon and change it thusly:
Alternatively you can do it through the Sound Control Panel. In Windows 10 Type “Sound” in the search Bar, and click on Sound Settings. That should bring this panel up:
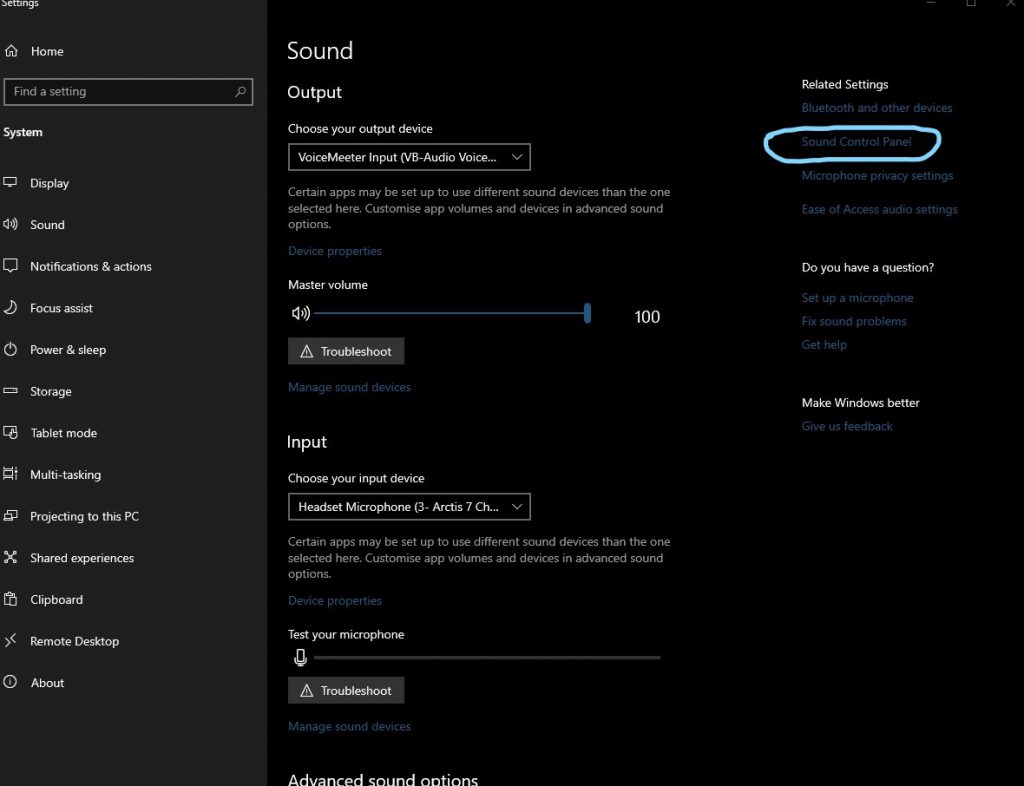
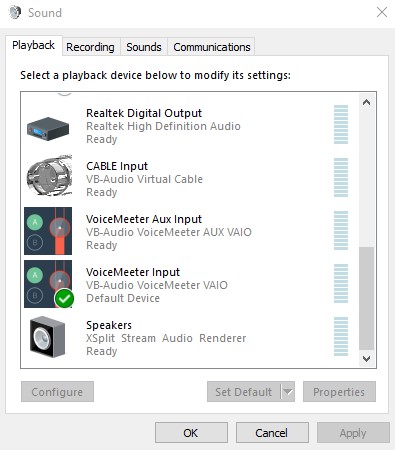
I’ve highlighted Sound Control Panel. Click it. Scroll down to Voicemeeter Input and make it the default.
Remember, you can go back to your normal device settings quickly by right clicking the speaker icon bottom right of your taskbar and selecting your monitor or standard speakers.
We can now set the Voicemeeter settings:
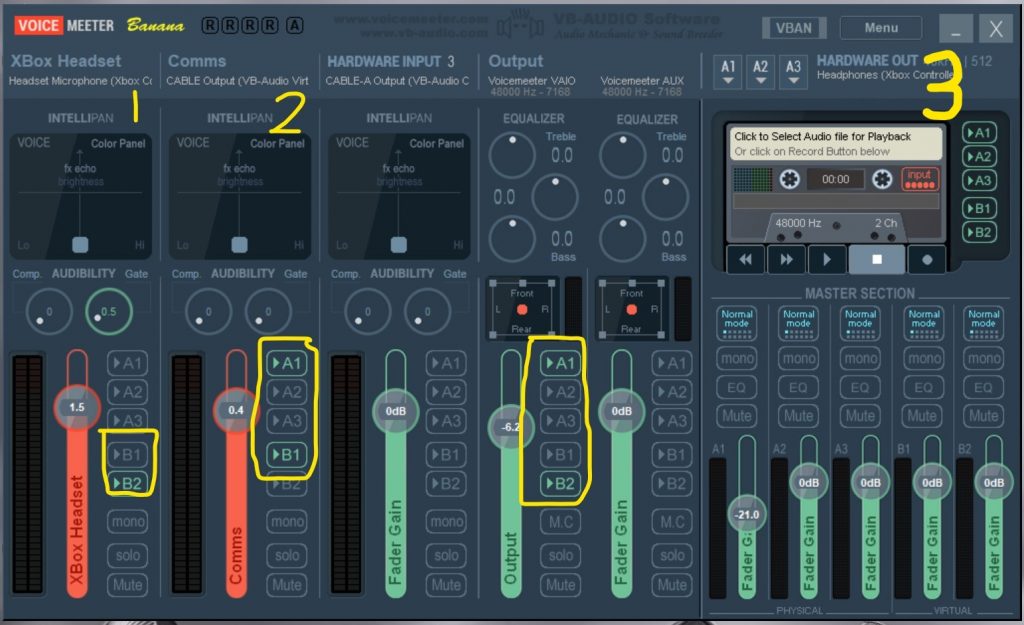
Relevant bits, just click on device name to change it (you can right click where it says “Hardware Input” and give it a new label like I have here), pick the WDM Option for each one:
- (1) Hardware Input – Your mic, make sure this is set to your standard microphone. Make sure B2 is lit. If you want to hear yourself in your headphones, you can light A1.
- (2) CABLE-Output – Hangout Chat. Make sure A1 and B1 is lit.
- (3) Hardware Out – Click on A1 and select your headphones.
- In the Virtual Outputs column (the fourth one), make sure A1 and B2 are lit.
Go into your chat place of choice (we’re using Discord) and put these sound settings in:
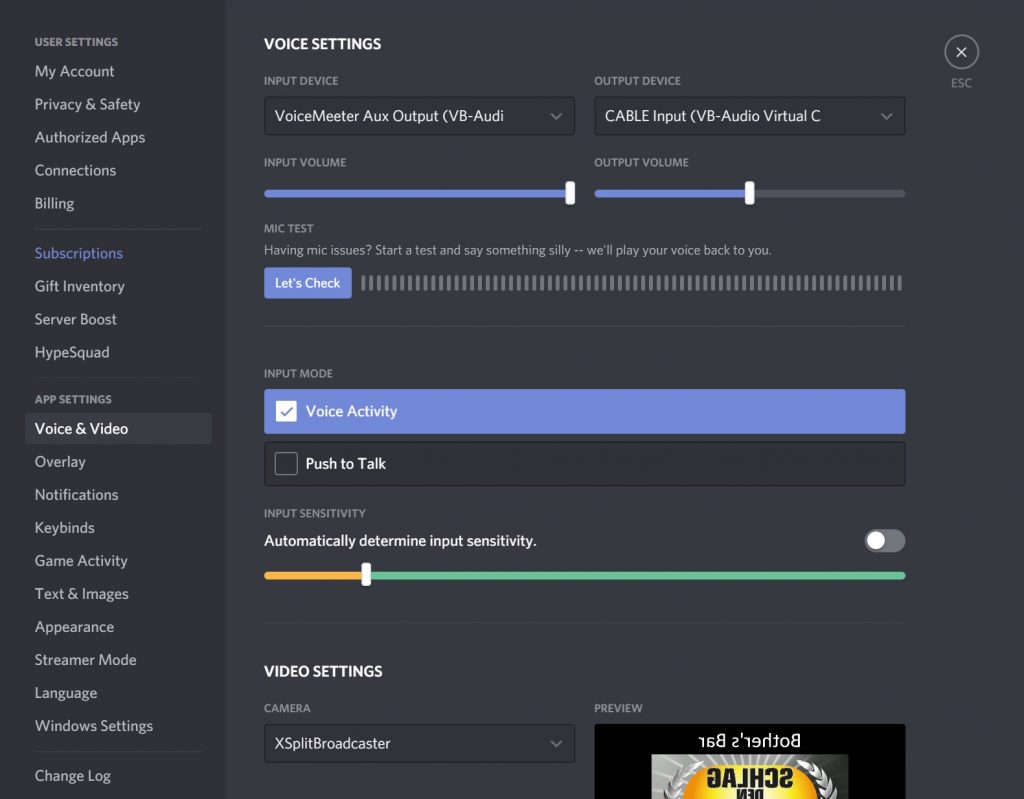
If you screenshare in Discord and your chatroom discovers it’s getting an echo, try telling them to mute the screenshare direct (button, bottom of the Discord screenshare) – the sound will still be coming through the chat.
2021 edit: Make sure that all background noise cancelling in Discord (in your Voice and Video settings) are off! Various updates might turn them on without you realising – Discord thinks it’s being helpful, but it will mess up the music for people in your Discord chat.
Right! That’s the background stuff sorted, now your settings for XSplit and OBS. I find XSplit a bit more intuitive, but it has a licensing cost attached although keep an eye out on Humble Bundle for cheap licenses which pop up. OBS is powerful and free and you may prefer it.
This guide assumes you are happy enough to fiddle about with the graphics and streaming stuff, you just want the audio settings so that everyone (you, panellists, streaming audience) can hear the game audio and the chat.
In these examples I’m streaming the games through my Switch using an Elgato Video Capture Card, however the source settings should be pretty universal whether you’re doing that or using your PC.
Let’s start with XSplit.
XSplit Broadcaster – updated for 2020
This is actually relatively straightforward! Go to your settings (the gear icon next to your speaker icon) and make sure the mic and output are correct. System Sound needs to be Voicemeeter Input, microphone is your mic.
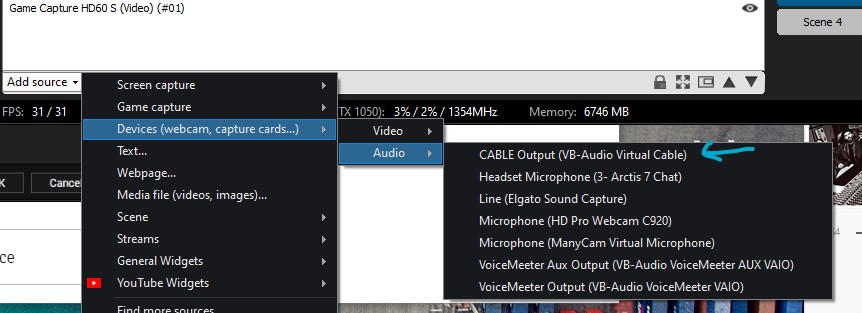
Next you need to add CABLE Output as an audio source.
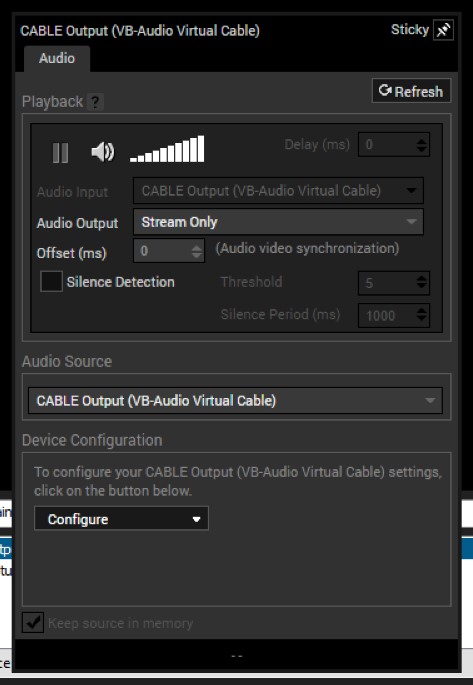
Finally right click on the CABLE Output source to bring up its properties. Ensure the Audio Output is set to Stream Only, or you’ll get looping.
And that’s it! You’ll need to use the faders on Voicemeeter to adjust the levels but XSplit doesn’t do a lot of adjustment in itself.
OBS
On the right, click on Settings, go down to audio. Change Desktop Audio to Voicemeeter Input (VB-Audio Voicemeeter VAIO) and Mic to your normal mic.
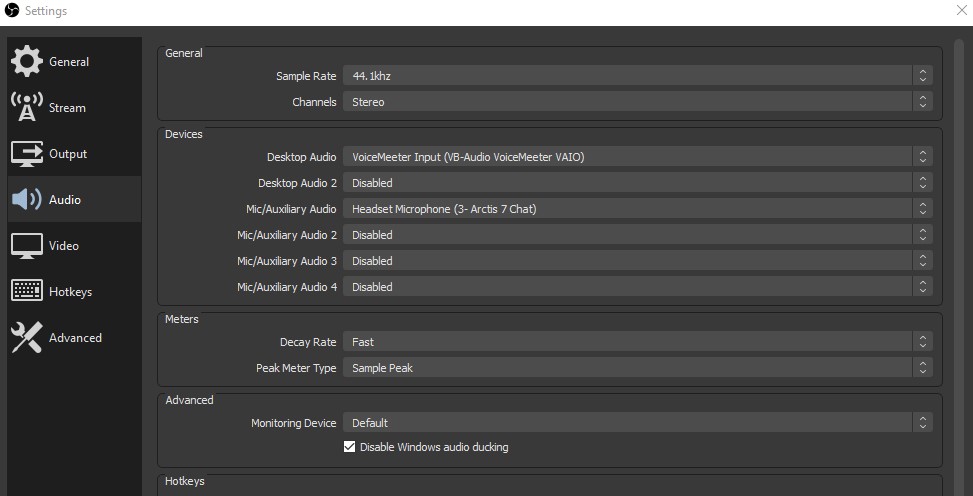
If you’re using a video card it needs to be set to Output Desktop Audio. Add it as a source and then in your sources right click on it, go to Properties and change it, it’ll be down the bottom.

Next you need to add the chat. Add an Audio Source, you want CABLE Output. I’ve renamed it Hangout Audio here.

Your OBS mixer should look something like this (may be scrollable):
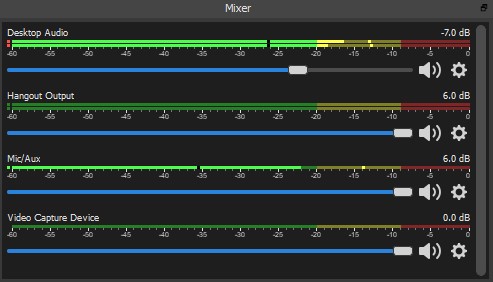
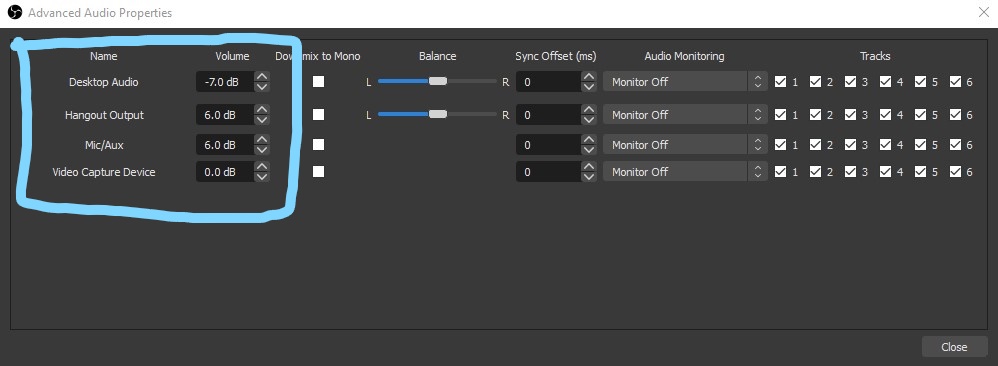
Right click on one of the gears, doesn’t matter which one, to bring up Advanced Audio Properties. OBS has a habit of trying to overcompensate on game audio, some playing around suggest this is a fairly good set-up so that the game audio doesn’t drown out the chat on the stream (which you won’t notice when recording).
All things being well, you are set up!
We hope you find it useful – we still refer to the original guide whenever we needed to do a Game Night, OBS and XSplit will remember your settings between sessions which is useful, so you might only need to set-up once.
There are, of course, other ways to set this up.
In theory, we could use the VoiceMeeter Aux Input instead of the Virtual Cable.
I have a slight preference to doing it this way, though, since things are less fiddly with OBS.
Feel free to experiment if you have other audio or video sources.
A couple of notes, so this page might get updated later:
* If the game lets you change the sound levels, 40% is about right.
* In Xsplit, you want to put the speaker at about 30%.
* In VM, column 1 is your mic, column 2 is the Hangout chat, column 4 is the game audio. Changing the last one effects the volume of background in the Hangout, but not so much in the stream.
This is a very good video and worth a look – will be trying to finesse everything in due course:
https://youtu.be/EdAhR_CdjLc
Another thing to play around with:
https://youtu.be/dVkzGe82o5Y
Right, Scott and me spent about three hours fiddling with this the other week and so here’s my current set-up in how-to form. It may get better yet when I’ve attached the line-in from my capture card to my soundcard, then I should be able to control the game audio for my Switch independently (rather than having to turn the sound down in game rather), but right now we’ve used this a few times and it’s stable and works well.